“`html
How to Properly Lay Pavers for a Durable and Attractive Patio in 2025
In the world of outdoor design, knowing how to lay pavers can transform your backyard into a stunning retreat. Whether you’re creating a patio, driveway, or garden walkways, understanding the processes involved in paver installation is crucial for achieving both durability and aesthetics. This comprehensive guide will walk you through every step of the paver installation guide, from preparing your base to sealing your finished project, ensuring that your outdoor space looks great for years to come.
Paver Base Preparation
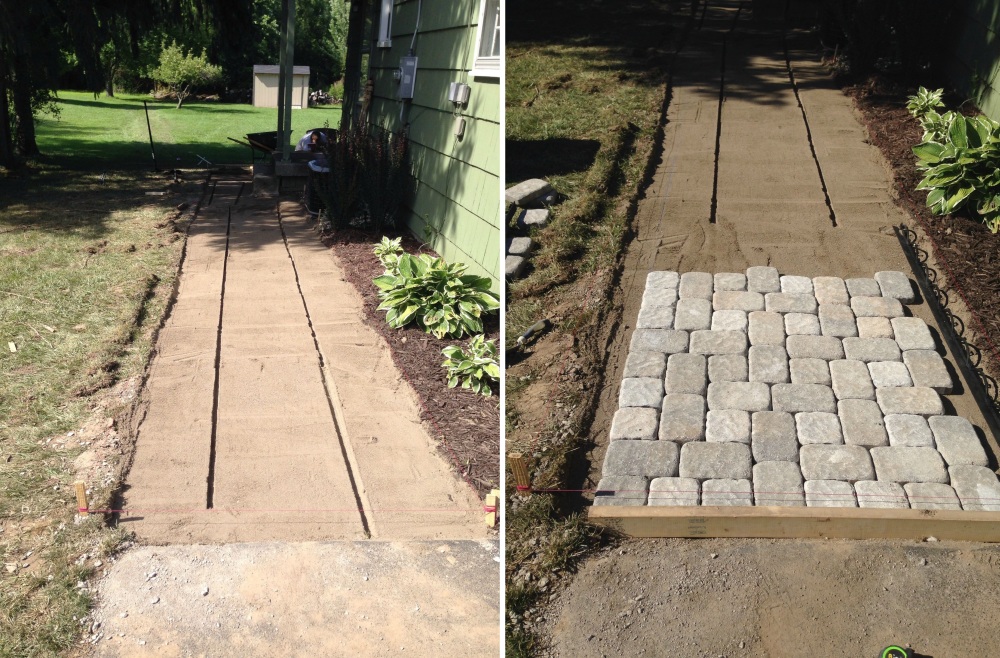
Before jumping into the design of your outdoor flooring, a solid foundation is key. Paver base preparation involves several layers that play an essential role in your patio’s durability. Start by excavating the area where you plan to install your pavers, ensuring it’s approximately 6-8 inches deep. Then, lay down a layer of gravel — ideally, a mix of coarse and fine aggregates. Compact this layer thoroughly using a compaction for pavers machine, ensuring a solid, level surface. The proper preparation can substantially enhance paver drainage solutions and reduce future maintenance needs.
Choosing the Best Material
The choice of materials can significantly affect your paver project’s outcome. Opt for a highly durable base material, such as crushed stone or gravel, that offers good drainage. Glass, recycled concrete, or permeable options are eco-friendly choices to consider. Ensure the materials are suitable for the intended use of your outdoor area, whether it’s a patio, walkway, or driveway.
Calculating the Right Amount of Pavers
Utilizing a paver calculator can save time and reduce waste. Measure the area you plan to cover with pavers and input these dimensions into the calculator. Multiply the square footage by the thickness of your chosen pavers. This helps estimate how many pavers you will need for your project, ensuring you have enough to avoid delays.
Installing Pavers: Step-by-Step Process
The installation process for patio pavers requires meticulous attention to detail. Once your base is prepped, it’s time to begin laying pavers. Start from the corner of your project, laying each paver tightly against the others. Use a paver installation tools such as a rubber mallet to set each paver, ensuring they are level as you progress. Maintaining consistent spacing for joints is crucial, and using spacers can help achieve even gaps. Paver joints contribute to overall stability and aesthetics.
Engaging Strong Edging for Pavers
Proper edging for pavers is an often-overlooked aspect of paver installation. Edging materials, such as aluminum or plastic, help prevent shifting and keep your pavers aligned over time. Secure the edging deeply in the soil, connecting it to your base layer. Regularly check alignment as you lay down pavers, making adjustments as needed to maintain a neat and professional look.
Dry Laying Technique
One effective method for ensuring your pavers fit correctly is the dry laying technique. Before permanently installing your pavers, lay them out in your desired pattern without any adhesive or base material underneath. This method allows you to visualize paver patterns and make adjustments to achieve your desired look, ultimately avoiding costly mistakes.
Paver Leveling and Finishing Touches
Once all your pavers are in place, ensure they’re level by checking the surface from multiple angles. Utilize a straight board and concrete level for this process — any uneven pavers can potentially lead to future cracking. If adjustments are needed, lifting and realigning pavers may be necessary for achieving level pavers. After leveling, sweep sand for pavers into the joints to set them firmly.
Sealing Pavers for Longevity
Sealing your pavers is an essential step in ensuring their longevity and aesthetics. Sealing pavers not only enhances the color and texture but also protects against stains and weathering. A high-quality paver sealer should be applied once the patio is clean and dry. Following the manufacturer’s instructions is critical for achieving optimal results.
Routine Paver Maintenance
After the initial installation, maintaining your pavers is vital for their lifespan. A consistent paver maintenance routine includes cleaning debris, addressing weeds, and checking for joint filler degradation. Regular inspections will help you catch issues early, ensuring your beautiful patio remains intact without major repairs.
Paver Patterns and Aesthetic Design
Developing a pleasing aesthetic with paver patterns can transform the look of any outdoor space. There are numerous patterns to choose from, including herringbone, basket weave, or running bond configurations. Consider the surrounding landscape when designing your patio to create an integrated look with your home’s architecture.
Exploring Unique Paver Designs
Don’t hesitate to explore unique paver designs to set your patio apart from the rest. Experimenting with size and color can create a visually striking contrast against your garden. Mixing different shapes and colors can also be effective in defining pathways or entertainment areas within your backyard.
Incorporating Lighting with Pavers
Paver lighting techniques can enhance the appearance and safety of your outdoor space. In-bed lighting along pathways can create a magical ambiance after sunset. Applying spotlights can highlight specific landscape features, creating an inviting environment. This combination of function and design elevates the charm of patios crafted from pavers.
Conclusion
Mastering how to lay pavers effectively can lead to the creation of a beautiful and robust outdoor area, tailored to your preferences. By following a comprehensive paver installation guide that encompasses preparation, installation, and maintenance, you ensure that your patеio remains tidy and appealing for years. Whether opting for DIY or hiring professionals, understanding these principles is fundamental to your success.
FAQ
1. What tools do I need for installing pavers?
Key tools include a rubber mallet, paver level, compactor, measuring tape, and a paver cutting saw for precise cuts. Having these essential paver installation tools ensures a smooth and effective installation process.
2. How do I maintain my patio pavers?
Routine maintenance involves sweeping away debris, checking for cracked pavers, and resealing every 1-3 years, depending on weather conditions. For effective paver maintenance, consider investing in a professional assessment once every couple of years.
3. Can I install pavers over an existing concrete slab?
Yes, a method known as installing pavers over concrete is possible. However, it is crucial to ensure proper drainage and use an adequate adhesive to avoid complications down the line.
4. What are the best materials for patio pavers?
Eco-friendly options such as permeable pavers, concrete pavers, and fired clay are popular choices. Selecting the best material for your needs involves considering aesthetics, durability, and sustainability.
5. What should I avoid during paver installation?
Avoid laying pavers on an unstable base or skimping on the number of necessary layers. Inadequate paver joint spacing, improper leveling, and neglecting sealing can lead to common pitfalls in your project.
“`