How to Indent in Word: Effective Ways to Enhance Document Formatting
Indenting text in Microsoft Word plays a crucial role in enhancing the readability and overall appearance of your documents. Whether you are working on formal reports, essays, or creative writing, understanding how to properly indent in Word can significantly improve your document formatting. This guide will explore various techniques for creating, modifying, and utilizing indents in Word, allowing you to develop polished, professional documents effortlessly.
Understanding Word Indentation Options
Before delving into specific methods, it’s essential to understand the devices available for setting indents in Word. The software offers various options for adjusting indentation in Word, ensuring that you have tools to achieve precise formatting for your text. Users can choose between several indent formats, including first-line indents, hanging indents, and standard paragraph indents. Learning how to differentiate among these various indentation options will set the foundation for efficient document styling.
Types of Indents in Word
When you are considering adjusting indentation in Word, knowing the different types of indents is paramount. The primary types include:
- First-line indent: This option indents the first line of a paragraph while keeping the rest in line with the left margin. It is commonly used for paragraph formatting and is essential for bibliographies and citations.
- Hanging indent: This format indents all lines except the first, commonly used in reference lists or bibliographies, making the first line of each entry flush left.
- Block indent: This method indents an entire paragraph or block of text, effectively moving it away from both the left and right margins. Block indents are often used for quotes or to emphasize particular content.
By learning about these types of indents, you will be better equipped to create indents in Word that suit your document needs.
Using Ruler to Indent in Word
One of the most hands-on methods to create and adjust indents in Word involves using the ruler tool. If the ruler is not visible, it can quickly be activated by going to the “View” tab and checking the “Ruler” option. Here’s how you can utilize it:
- Select the paragraph or paragraphs you want to indent.
- On the ruler, the upper triangle represents the first-line indent, while the lower triangle represents the hanging indent. Drag these triangles to adjust your indents effectively.
- You can also click and drag the rectangular slider on the left to create a block indent.
Utilizing the ruler enables you to visually see how your adjustments impact your document formatting in real-time, ensuring you achieve the desired settings with precision.
Indent Tab Settings in Word
To customize your indent settings in Word even further, you can access the Paragraph dialog box. Here’s how:
- Right-click on the selected paragraph and choose “Paragraph.”
- In the dialog box, locate the “Indents and Spacing” tab.
- Under “Indentation,” you’ll find fields where you can specify the amount of indentation for the left and right margins. Additionally, set up specific first-line or hanging indents for custom styles.
By adjusting indent tab settings in Word, you can create specific indent formats that align with the overall structure and style of your document.
Best Practices for Indents in Word
Using indents effectively in Word not only improves aesthetics but also aids in creating a logical flow in your documents. Here are some best practices for implementing indents:
Creating Efficient Indents for Lists and Bullets
When dealing with lists in Word, proper indentation is key for clarity. Whether creating bullet points or numbered lists, the formatting of your indents can make a significant difference. Use the “Increase Indent” button located in the Paragraph section of the Home tab to create logical progressions in nested lists. Additionally, using shortcuts for indenting in Word can expedite your work:
- Press Tab to increase indent
- Press Shift + Tab to decrease indent
Adhering to these practices allows for a seamless reading experience, making your lists easy to comprehend.
Adjusting Indents for Headers and Footers
If you want to create a professional look, consider how you format your headers and footers. Consistent indentation in these areas will help standardize your document’s appearance. Aligning header levels appropriately, including appropriate amounts of indentation, can facilitate the hierarchical presentation of document sections. Here’s a basic approach:
- Open the Header or Footer section by double-clicking in the designated area.
- Use the indentation features as described earlier to create visual separation and hierarchy.
- Save changes to maintain your formatting across all pages.
By customizing your headers effectively, you enhance organizational clarity within your document, improving its overall impact.
Troubleshooting Indent Issues
Occasionally, users may face issues with incorrect or conflicting indent settings in Word. If you notice that your indents are behaving unexpectedly, consider the following troubleshooting steps:
- Check for conflicting settings in the Paragraph dialog box, as existing indentation might be overridden by other formats.
- Clear formatting using the “Clear All Formatting” button if issues persist, then recreate the desired indents.
- Examine any styles applied to text, as preset formatting may not align with your preferences.
Tackling these issues promptly will save you time and maintain professionalism in your document.
Key Takeaways on Indenting in Word
- Understanding different indentation styles enhances document formatting.
- Using the ruler effectively makes creating precise indents intuitive.
- Following best practices for lists, headers, and footers improves readability.
- Troubleshooting indent issues can prevent formatting disruptions.
- Explore shortcuts and tab settings for more efficient indentation management.
FAQ
1. How do I create a hanging indent in Word?
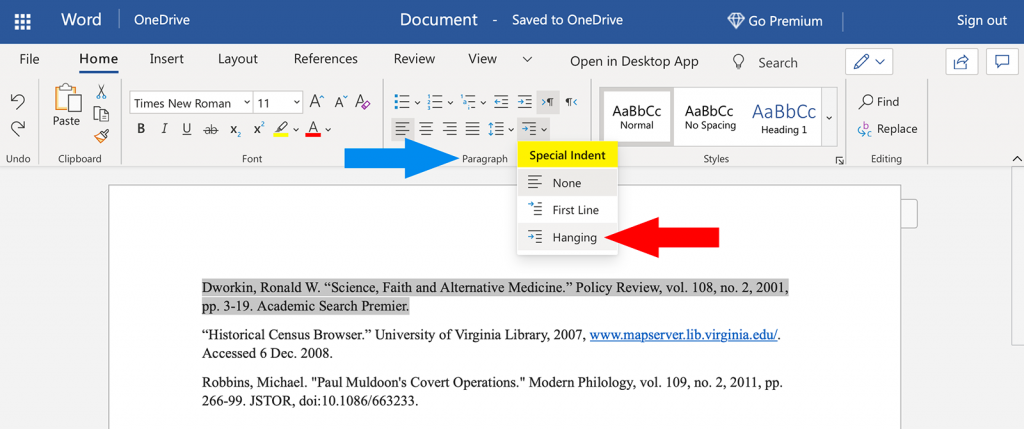
To create a hanging indent in Word, place your cursor at the beginning of the paragraph you wish to format. Right-click and select “Paragraph.” In the Indentation section, choose “Hanging” from the Special drop-down menu and set the desired measurement. Click OK, and your paragraph will then reflect the hanging indent.
2. What keyboard shortcuts can I use for adjusting indents?
For quick adjustments, press Tab to increase the indent and Shift + Tab to decrease the indent for highlighted text. These shortcuts streamline indent adjustments and help maintain formatting precision across documents.
3. Why are my indents all over the place in my document?
Phenomena such as irregular indents can stem from conflicting paragraph styles, improper settings in the Paragraph dialog, or previously applied formats. Inspect your document settings and clear any formatting if necessary to restore the intended layout.
4. Can I manage indents differently for different styles in Word?
Absolutely! You can create custom styles within Word and set specific indents for each style. This approach allows for a consistent format throughout your document while differentiating between various sections or types of content clearly.
5. What are the best practices for indenting bullet points in Word?
When indenting bullet points, using the “Increase Indent” button from the Paragraph section is recommended for consistent formatting. Also, ensure nested bullet points have sufficient indentation to differentiate them clearly from the main points.
By mastering how to indent in Word, you’re not merely improving your formatting; you’re enhancing the clarity, professionalism, and impact of your written communication.