Effective Ways to Hang a Picture in Your Home
Understanding Picture Hanging Techniques
Hanging pictures effectively can significantly enhance your home decor and reflect personal style. Mastering essential **picture hanging techniques** ensures that your wall art displays are not only visually appealing but also structurally secure. Most homeowners are eager to know **how to hang a picture** effectively, and it begins with proper planning. Start by choosing the right location and ensuring the stability of the wall you are working with. Consider the dimensions of your chosen **picture frames** and how they will fit together in the space. By utilizing various mounting techniques and adhering to best practices for installations, you can avoid common mistakes that might mar your design.
Key Mounting Techniques
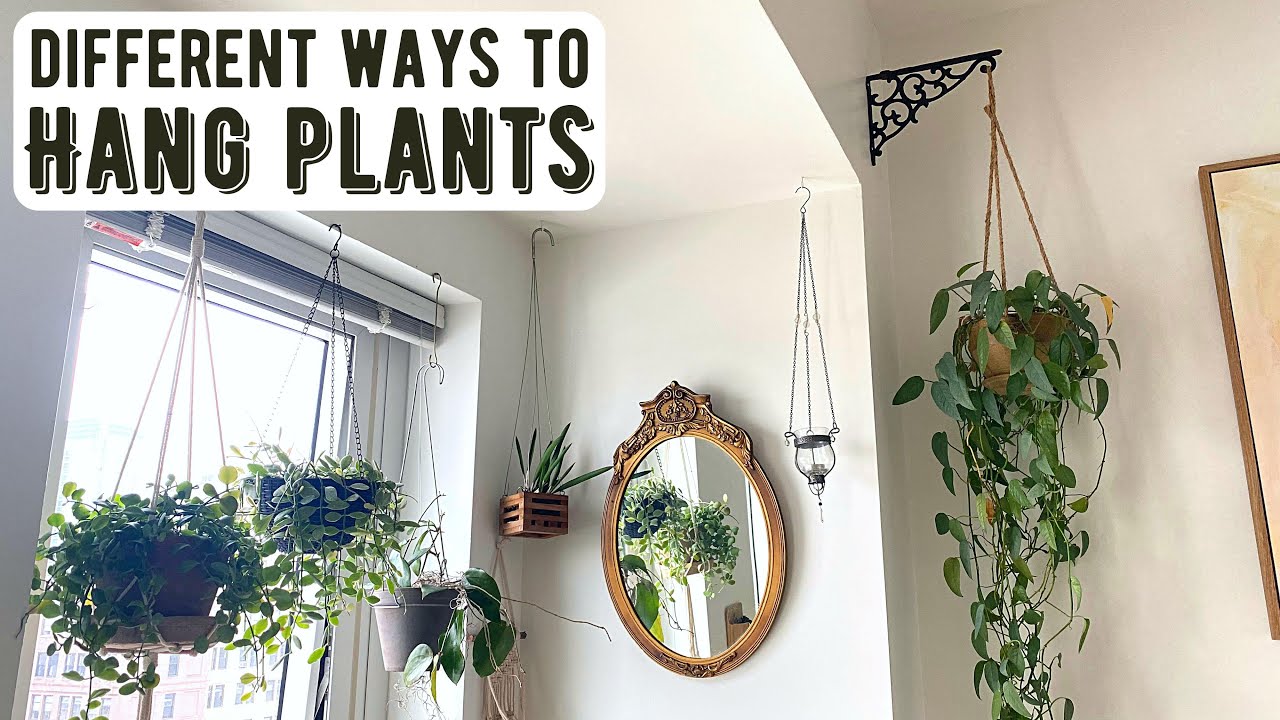
When determining the best method of mounting, various **mounting techniques** suit different types of artwork and wall conditions. For lightweight art, **picture hanging strips** offer a seamless solution without damaging the wall. However, when hanging heavier pieces, it’s important to utilize **secure wall mounts** and make sure to locate **wall studs** for adequate support. Techniques like using **wall hooks** or **wall anchoring** ensure that your installations hold up over time. If you have a variety of **frame types**, ensure you select hooks that accommodate their weights adequately. Assess your wall attributes—like drywall or plaster—to select suitable hardware for your picture’s success.
Measuring Distance for Perfect Placement
To achieve visually appealing placements, precise **measuring distances** between objects is crucial. Start by marking the desired height for your pictures; typically, this should be around eye level for optimal viewing. Use a level tool for accuracy, ensuring that frames hang straight. When organizing multiple images, create a harmonious look by spacing your pictures evenly. Aligning with one another can create a cohesive look, especially on a gallery wall setup. Planning your **picture wall combinations** ahead of time helps in establishing a balanced **art display**, transforming your space beautifully.
Using a Hammer Correctly
The method of **using a hammer** can dramatically influence the effectiveness of your picture hanging efforts. Ensure that you use the right nails or hooks for the weight of your frames. For basic installations, a simple thumbtack or classic nail suffices, but for anything heavier, invest in **picture frame hanging hardware** designed to reduce wall damage. Taking care to hammer at a correct angle can prevent misalignment and maintain the structural integrity of your wall surface. When hanging a piece above furniture, leave enough room to create a visual separation, adding to the **wall decor** aesthetics.
Creative and Practical Picture Hanging Tips
Incorporating **picture hanging tips** into your decorating routine can drastically change how your home feels. Design trends evolve, and so do the strategies to enhance wall aesthetics. While traditional hanging remains popular, exploring modern techniques brings a fresh appeal. For instance, integrating **floating shelves** allows for versatile displays, while using **decorative hooks** adds an element of creativity to your usual arrangements and displays. The goal should be to match your pieces’ color schemes and styles to ensure they contribute harmoniously to the overall mood of the space.
Gallery Wall Arrangement Ideas
Creating a **gallery wall arrangement** is a fantastic approach to showcase a collection of photos, art, or memories. Begin by selecting the frames, ensuring a desired style that complements each piece, subsequently considering the **portrait orientation** versus **landscape orientation** of your artwork. Before hanging, lay out your selected pieces on the floor and adjust until you achieve a mix of heights and layouts that feels right. Various art pieces grouped together can reflect your personality while utilizing spaces creatively within your home. Additionally, keeping a gap of 2-3 inches between frames enhances visual balance.
Coordinating Art and Colors
To maximize the visual appeal of your wall, it’s essential to coordinate art and colors across different **art frame options** and picture sizes. Utilizing a single color palette or complementary tones can establish harmony in your decor. As you introduce new pieces into existing decor, ensure they do not create a jarring sensation among the other elements. Instead, aim for cohesiveness in your **wall art layout**, combining vibrant pieces with understated backgrounds to evoke stunning contrast and unique appeal. Learning techniques for **aligning visuals** can bring forth seamless transitions between color dynamics and style variations.
Spacing Between Pictures for a Balanced Display
Effective **spacing between pictures** plays a crucial role in their overall presentation. When displaying art, the balance between busy pieces and more simplistic artworks positions them as focal points, optimizing everything’s impact. Remember, while it’s tempting to hang all pieces close together, strategic spacing—ideally 2-5 inches apart—can enhance visual clarity, helping each piece shine on its own. Also, as a friendly reminder, avoid placing pieces too high; they should interact with your eye level for enjoyable engagement.
Vertical and Horizontal Arrangements
When considering traditional versus creative approaches, your Hanging arrangements may vary from **vertical hanging** to **horizontal arrangements** depending on your wall space and design theme. Utilizing **vertical hanging** techniques can work wonders for tighter areas or narrow walls, drawing the eye up. Horizontal frames create a relaxed atmosphere and fill large areas satisfying visual balance across your wall spaces.
DIY Wall Art Inspiration
For those looking to express their creativity, **DIY wall art** proves an excellent method to personalize your space. Finding old frames can spark inspiration, as you may repurpose them into unique arrangements. Use dimension play to create a stunning background while displaying lighter arts or photos. Try to incorporate elements like twine for hanging lighter pieces or magnetic strips for art that can be frequently updated without hassle. Enabling greater engagement with the vertical space available allows for optimizing areas that we might typically neglect.
Utilizing Wall Safe Adhesive Methods
For renters or those who don’t wish to damage walls, consider using **wall safe adhesive** solutions to mount pictures without leaving nail holes. This is especially useful for light of medium-weight art. Adhesive strips often come recommended by art professionals, especially as they help with even **mounting techniques** while allowing for easy removal when rearranging your hangings. Careful placement is essential to prevent any visual distortion of frames during installation.
Common Mistakes to Avoid
Many newcomers to wall decor might encounter classic pitfalls during their **art installation** tasks. Forgetting to measure or failing to gather required tools often results in frustrating adjustments, while incorrect **nail placements** can quickly leave unsightly holes. Additionally, misalignment between frames creates a chaotic visual experience. Prepare accordingly with comprehensive instructions and sufficient materials to limit the challenges you may face.
Key Takeaways
- Utilize the right tools and techniques to secure art properly on walls.
- Explore innovative picture hanging styles like gallery walls, vertical, and horizontal arrangements.
- Plan the arrangement carefully, ensuring spacing and alignment are consistent for visual clarity.
- Embrace creativity through DIY art approaches and unique mounting solutions.
FAQ
1. What are the most effective picture hanging tools?
The essential picture hanging tools include hammers, nails, wall hooks, and picture hanging strips. Certain tools like levelers and measuring tapes will ensure precision when positioning wall art, while a stud finder is invaluable for heavier frames to secure them properly.
2. How important is measuring height for wall decor?
Measuring height is crucial as it helps establish the right eye-level for viewing the pictures. A general suggestion is to place the center of the artwork between 57 to 60 inches from the floor, ensuring an optimum viewing experience across all pieces on display.
3. Can I use adhesive mounting for heavier frames?
Adhesive mounting is suitable for light to medium-weight frames. However, for heavier frames, it’s advisable to utilize nails or hooks anchored into wall studs for optimal security to prevent damage or misalignment over time.
4. What are common errors in picture hanging?
Common errors when hanging pictures include miscalculated measurements, improper hardware choice, and failing to align frames properly, leading to an overall lack of harmony. Planning ahead and thorough understanding of wall space avoids these challenges.
5. How can I create a gallery wall with unique aesthetics?
A creative gallery wall can be achieved by combining various frame styles and sizes, ensuring a cohesive color scheme. Laying out the pictures on the floor before hanging can help visualize the best arrangement, allowing for an eclectic and personalized wall display.